Monday, February 28, 2011

Building the bomb

As space is going to rapidly get tight, Make a sub-assembly of the rotrex and bracket and all the tubing/hoses.

So, away from the bike - attach supplied pre-cut oil feed lines to the rotex unit (nice that the banjo fittings are already clocked to their proper positions) using the supplied clamps. Long 29" out hose on top of unit, shorter 22" in on the front side. The rotrex has a flat base denoting the bottom of the unit to assist orientation.

 Attach the rotrex to the bracket with the 4 long tiny screws, remember the casting is aluminum, so use blue threadlocker and don't overtorque.

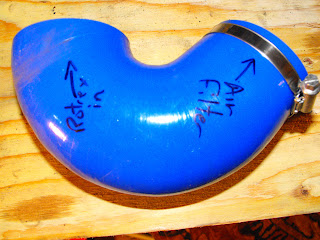
There's an asymmetric 135 degree elbow that clamps to the inlet, pointing virtually straight up with the opening facing the right side of the bike. (I marked mine for clarity)

Now clamp on the 90 degree outlet silicone tube, pointing directly across the bike to the left side. 
The kit comes with a complicated looking piece of precut heat shielding, practise several times with the backing still on until it makes sense, then peel and stick. Make sure your clamps are secure as they'll be buried under the shielding.


Sunday, February 27, 2011

Blower, meet bike...

Time has come. The crank connector is a critical piece. First, massage the o-ring into the groove of the "new" timing cover, aka the lower part of the bracket. Now it gets complicated. You'll need two kinds of  Locktite, a red 266 and the heavy duty green 609 retaining compound.


First CLEAN everything with a spray carb/brake cleaner to remove any oils.

The backside face of the crank connector gets a dose of red where it snugs up against the timing wheel, as do the threads on the new longer crank bolt.

The 609 gets laid in a thin bead between the outer diameter of the crank connector and the inside of the inner high speed bearing race. Push the connector through the bearing and apply a thin ring, then push it back through and redo the same. The idea is to get the connector and bearing race to lock together without getting any compound in the bearing itself.


Fit the bracket to the bike, making sure rubber sheet atop motor is out of the way and the clutch cable is ziptied to the ignition pickup and both are routed behind the bracket.

Just barely start the timing cover bolts and the longer cam chain guide bolt. Carefully push the crank connector assembly toward the crank, then bolt the pulley bolt into the crank end, ensuring the timing wheel remains in place. Torque to 45ft/lb.

Snug the timing cover bolts to 9ft/lb, the guide bolt to 18ft/lb. Also in the kit is a socket head bolt with a spacer and nut. Both nut and spacer have a flat ground on them. This assembly bolts through the bracket into an existing engine boss. Blue locktite. You can see half the bolt behind the idler pulley above.

Saturday, February 26, 2011

Toobin'

OK, there's not a lot of space and a lot needs to go in. Wish I had smaller paws. 

Installed the intake plumbing with it's integral BOV tubing, added a silicone elbow to the top. The ninja now gets it's air from below the steering head. 

The intake plenum is next. The manual has a cool pic of how all the silicone hose clamps should be clocked for install, but my mitts just couldn't do it. The incredibly tight fit meant I eventually removed the bottommost clamps entirely, then fished each through individually as the silicone finally was persuaded into place. 


This was honestly one of the toughest portions of the install, the tolerances are minimal. There was a lot of cursing and deadblow mallet use, but I would truly have been undone if not for....

Yep, a tiny pick set. This and his friends allowed me to get in and around the silicone without tearing, gently coaxing them to seal like you'd roll a tire onto a rim.

So glad that's over.


Connected front inlet to intake pipe, added the BOV to it's runner and attached the vacuum line and it's own cool little filter.


Friday, February 25, 2011

Coolers...

Getting the rad ready to go back in, completing the rotrex oil circuit....

The kit comes with a longer bracket to space the bottom of the radiator further from the engine. Use red locktite to secure this to the block, but don't do as I did in this pic...leave the rad unconnected for now.

The kit also comes with a series of grommets and bracketry that allows the top of the rad to move down and forward. Basically you're building a little "briefcase handle" atop the rad. It then mounts to the bikes original top points using this handle, allowing a swing motion. Here's a pic of the silver "drop bracket" on the left side...


Mount the top of the rad to the bike.


The Rotrex traction fluid needs a circuit to ensure the unit gets a constant supply of cool filtered oil...

All the lines are precut, barb fittings preset, clamps all provided.

Lines... the two long lines from the rotrex are ziptied together, and are looped behind the radiator after getting a wrap of heat shielding where they pass near the exhaust. The hot oil leaving the rotrex loops up over the left top of the rad and falls into the provided oil cooler, which uses specialized ties to simply clamp it to the left front of the existing rad. Now cool, the oil returns to the reservoir, where it has a minute to defoam through the blue breather cap. P.S., don't clamp this hose on without bleeding the system, the lines are extremely tough to remove from their fittings. The reservoir is held upright by one screw, tapped into the top of the left frame rail.

It leaves the bottom of the tank, passes through a filter, and on back to provide boost happiness. Easy.

The system must be primed before use, though. Use either compressed air into the breather hole until you see return fluid, or use a brake bleeder to suck fluid through the system. I'm afraid of trapped air bubbles in fluid lines, so I used the vacuum method. No problems.

Install the aluminum intake elbow onto the silicone tubing and clamp. Realize the filter will live under the right fairing panel just above the radiator cap to visualize the necessary angles.

Reinstall upper small coolant lines, attach to lower mount, and tighten upper mounting bolt.
The right upper hose (the one that used to connect to the part that was cut and flared) is now too short to make the trip. Cut the hose just above the timing cover uppermost bolt and splice in the aluminum tubing. 

Now it reaches. You'll have to cut an angle at the end of the hose somewhat to get a clampable match onto the flared barb.
Thursday, February 24, 2011

Got compression, air,spark....

Need fuel.

The 10r's fuel pump is not a burly thing, multiple reports of failure, barely adequate flow rates, and expensive to replace when it does fail. But, a much more powerful pump fits in the same space with minimal modification. It's included in the kit.

It's a Walbro 250. Here's the difference....


The in-tank fuel pump housing. The yellow highest wire is the low-fuel sensor, the golden "top hat" is the pressure regulator. Dissambly is easy, the two side screws and the two electrical connections get undone, then the whole pump slides out of the "sump". Further discerning pulling separates the pump itself from the housing.

As the new pump is taller than the stock one, both the white regulator retainer clips' tail and the regulator tail itself must be shortened. Dremel. There are several o-rings around the various inlets, use a flashlight to ensure you remove/replace all as necessary otherwise an errant one can block fuel flow.
The small white clip in the center of the pic applies pressure to the pump outflow tube, it needs a bit of dremel work as well to sit flat on the new pump, as the tabs are slightly different. The base of the stock pump is treated to a rubber gasket, this gets tossed. The white retaining clip goes back on, though. Ensure the new pump and wiring harness are seated as fully as possible. Of note, the fuel filter screen that comes with the kit is particularly difficult to coax into the sump. Slow methodical corner by corner will allow it to descend, though.

Ensure the wires are routed behind the new connector and as close to the pump as possible as it's a tight fit to get the assembly back in the tank. Also ensure that your connections are secure and correct as they'll be in a fuel tank a long time. 

The regulator retainer (white clip) must be secured with a zip tie to ensure the regulator doesn't pop out. Use the smallest diameter tie possible as again it's a very tight fit to get it into the tank.

Clean/replace the big o-ring if needed, then torque to 7ft/lb with red locktite. Reinstall tank on bike, bolt rear down, prop front. Connect electrical,vent and fuel lines.

Wednesday, February 23, 2011

Ready? Fire?

O.K., acid test time. Oil? check. Oil in rotrex? check. Fuel? check. Coolant? Not yet...but only a test fire....

Key on. Lights on. Kill switch on. Weird. No sound from the fuel pump. Flashing "low fuel" light. In neutral. Hit the starter. Motor turns over, doesn't fire. Again. Nope. 

GRRRR.

Not good. Can't figure it out in my groggy state. No error codes when I check dealer mode, the bike will prime the lines and run if I jumper in 12v direct to the fuel pump connector.

Fuel pressure about 42psi according to my tester. Won't hold residual pressure in lines.

Multimeter everything. The fuel pump is supposed to turn on with the key, run for 3-4 seconds to prime the lines, then shut off until the bike starts. So, the voltage should be battery voltage for those four seconds, followed by 0. I'm getting constant battery voltage at the pump. Not enough amperage to run the pump, though.

Put the old pump back in, same problem. Put the new pump back again, same issue.

After messing with the fuses, the relays, unplugging and replugging every connection I could touch, I was getting frustrated.

Then, the flashing low fuel light started triggering my thoughts. There was plenty of gas. What about a defective sensor? Did I break it in my multiple removals?
I went looking for low fuel sensor voltages in the manual. HMMM.

I'd inadvertently attached the low fuel sensor lead to the positive fuel pump lead. Replaced them, bolted it up, fixed. Pump primes as it should.

Hit the starter. It Lives!!!!!

Maybe I should wear a helmet everywhere.

Tuesday, February 22, 2011

Loose ends...

It runs! I'm a happy guy. 

Filled and bled the cooling system with "Engine Ice".

Put on the belt. Adjusted Idler tension until it read the 55-65lbs with the supplied tension checker. Torqued bolt to 40ft/lbs. 

Nothing I've done so far has made me more happy that finally tensioning that cogged belt.

Dragged the laptop into the garage, fired up the powercommander software, threw the included blower map cd in. Jumpered a spare 9v, uploaded the new map without an issue. Will get it dynoed and personally tuned, but it's more than ok for now.

Squeezed the preoiled intake filter to clear the right fork leg a bit, clamped it on. 

Rechecked the rotrex oil level, added some fluid to get to the prescribed 1/2 mark. Bolted up the tank, reinstalled my dampener, put the seats back on.... oh.....

Opened the garage door to find this.

Yep, snow. In Seattle.

It idles well, tracks straight belt wise, revs monstrously to 6500rpm (100km breakin period you know).

Go away snow.

Monday, February 21, 2011

If I said you had a beautiful body....

One of the cool things is that the whole thing hides under stock fairings. They need a little modding/spacing out but it's virtually unnoticeable even to other riders until you see the belt drive peeking out.

First, the inner panels alongside the front wheel that carry the turnsignals need some trimming to clear the spaced forward rad., the template is supplied. I used a dremel tool with a spiral bit designed for wallboard. At med high speed you can draw fine shapes with it. Leaves a nice edge too.

The bellypan needs the rounded triangle hole enlarged to clear the crank pulley. This is my freehand result...


The right mid fairing needs some contouring done to allow the modified rad hose to run alongside it, mostly slicing off lips. In this pic, the piece closest to the camera folded 90 degrees to the main panel needs to go away.
The kit comes with a small assortment of spacers that push the right fairing out 1-2 inches, yet keep it tucked in at the bottom to maintain ground clearance. I did have to trim around my frame sliders, but it too was minimal...


OK, stay tuned for the ride, videos, reports, etc. It begins.

Saturday, February 19, 2011

 It's March 8, 2011

I'll keep messing with the posting dates so the blog'll read as a cohesive chronological whole, though

OK, weather broke here in Seattle. Got out and did 40 of the recommended 65 miles of breakin time. 

Honestly, the bike felt pretty much exactly the same as before I did anything, just a little more sensitive to throttle and a bit quicker pickup. Then I remembered I was keeping it below the recommended 6500rpm.

Looking at the chart, I have about 90hp at 6500 rpm to the stock 80 or so. Then at 8500 rpm it's making 150 or so, and on up from there.

Extremely cool to look down and see that spinning blower drive as you cruise along too, reminds you it's a thrashing mechanical thing you're riding

It's tough keeping this beast reined in. Can't wait to be able to twist it's tail. Anyone got a favorite place to buy swingarm extensions?

This is going to be fun.

Friday, February 18, 2011

It's March 10th,2011.

Despite gusting crosswinds, cold wet tires on cold wet pavement, and bands of rain moving along the foothills, I jumped on the ninja and did 80 miles. Which means I'm officially out of the break-in period.

Wow. Remember your first literbike ride? Where the power just kept coming and coming to the point where all you could do was laugh in your helmet? Well, I've been riding my zx-10 for years, and have become jaded/habituated, but it's now like that all over again.

The power delivery is just SO smooth, just like somebody snuck in a stroker zx-14 under the bodywork. Rolling on through the corners, throttle transitions, it all just feels like the stocker bike, just turned up to 11.

The short sharp blast of the blowoff valve doing it's thing with every high rpm shift, carrying the front wheel a few inches high effortlessly through the gears, every straight is suddenly so much shorter.

I'm gonna like this thing.

Thursday, February 17, 2011

Rain, rain go away!!!!!

It's March 25th, 2011.

Still no ride reports, work and the absolutely crappy weather here in Seattle have conspired to keep me off the bike.

Also, the fun roads are still covered with a fine mix of deicer and grit/gravel strewn randomly in the corners, not a really condusive place to be playing with 220 hp.

Waiting for spring. I'll post as I ride.

Wednesday, February 16, 2011

Hiccups....

It's May 22, 2011

Took my bike to the local track, the poor thing wasn't making power over 9000rpm.

Got it home, took apart the blower drive. Found the outboard support bearing had spectacularly failed. Both races discolored blue, some grind marks from the pulley on the bracket face.

Sent off an email to the kit maker. Sent the parts back to him.

Seems the bearing company sent the wrong clearance bearings, and upon exam, the kawi crankshaft end is not square to the axis of rotation, resulting in a small amount of runout as the crank spun. This runout loaded the bearing races to failure.

The fix.

 The outboard bearing is engineering overkill anyway as the overhang is short, so a simple seal where the bearing was is the solution. A+A tested a proto bike for a week without issue.

Since the bike was apart anyway, I went ahead and ordered the 10psi pulley( Stock one goes to 8.). I have a cruiser/everyday bike (Triumph Rocket), so the ninja is becoming my toy/trackday beast. Should be fun.

 Hoping to have a dyno sheet this week for y'all.